Hello folks,
today I’d like to start a small series about Native Instruments Massive – currently one of the most popular virtual synthesizers. Just as many of you I would like to create my own Massive patches, my own distinctive sounds.
There are so many video tutorials. Most of them are step by step tutorials how you get a specific sound. But although Massive is so complex, there are only a few basic introductions. But I think, a fundamental understanding and knowing what’s going on in the background, leads you to good sound design. So let us take a closer look at the routing tab.

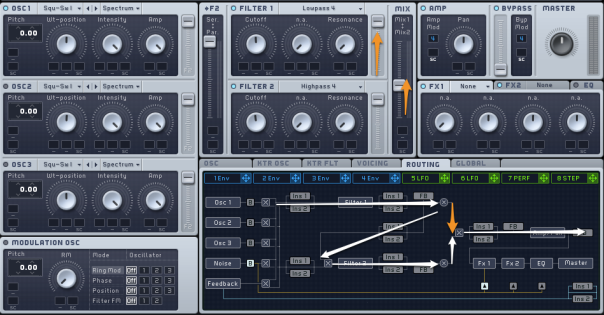
Routing tab (red arrow), device and symbol (orange arrow), signal flow (white arrows)
The routing tab shows the whole circuit diagram of the synth, e.g. the wiring of all elements. After I have shown you some examples, you will understand how the signal flows through the synth. Here is just a taster: Massive has three wavetable oscillators. You find the three symbols OSC 1, 2 and 3 on the left hand side of the routing tab. The oscillators are wired with two filters. The filter outputs are mixed and so on. I think that’s enough for the beginning.
1. Real serial filtering

In the first example I like to route the output from oscillator 1 through filter 1 and after that through filter 2 – the classic serial circuit. Needless to say, the oscillator 1 is switched on. The switch is located at the left of the device title. The lamp light must be blue. The diagram below must be read from top to bottom and from left to right.

The fader of OSC 1 is at the top, in order to route the signal only to filter 1. The fader ->F2 at the very top (serial), because filter 2 should get the input signal only from the output of filter 1. The MIX fader is on the very bottom, in order to route only the output of filter 2 to the synth’s output. (By the way, the MIX fader can be in the central position, in case – like in the screenshot – the slider of filter 1 is down.) The white arrows in the upper picture show the flow of the signal.
The next pictures shows how the UI elements and the circuit diagram are related.

1.1 Mixing serial filtering

But do not let us kid ourselves, the signal flow gets easily more complicated. Just stay at example 1. Real serial filtering and add one signal flow. By pushing up the MIX fader, the output of filter 1 is routed directly to the synth output without running through filter 2. The white arrows in the lower picture show again the flow of the signal and the orange one is new signal flow.
1.2 Bypassing the filters
If you like to bypass the two filters in order to add a subbass. You can use the Bypass bus.

Let’s vary the example 1. Real serial filtering again, in order to get bypassing. I have switched the OSC 3 on and made a kind of trick. I routed the oscillator signal only to filter 2. But the ->F2 fader position shows you, that the signal never will reach filter 2, because of its top position. Maybe you noticed the white B in the circuit diagram (Click it, if it’s not white!). That means, the output of OSC 3 is directly routed to the EQ device. Now there is only one step left. If you switch on and upper the Bypass fader you can hear the output of OSC 3. This approach is generally interessting if want to avoid processing one oscillators.

2. Real parallel filtering
In this example I will use two oscillators. Oscillator 1 is routed through filter 1 and oscillator 2 is routed through filter 2 – the classic parallel circuit.

The fader of oscillator 1 and 2 are set in that way, that signal of OSC 1 flows through filter 1, and vice versa. The fader ->F2 is at the very bottom, to run the filters in parallel. The two fader of the filter devices are at the top, in order to run their signal to the synth’s output. The fader MIX is in the center position, to mix the oscillators with equal volume. The next pictures shows how the UI elements and the circuit diagram are related.

2.1 Mixing parallel filtering

By pushing up the fader ->F2 a bit, the output of filter 1 is routed into filter 2. So filter 2 is processing the output of OSC 2 and OSC 1 after filtering by filter 1.
That sounds complicated, that’s the reason, why I prefere diagrams. The orange arrow shows the addition signal flow, from filter 1 output to filter 2 input.

For the sake of completeness, you can enable more than the bypass (b) in the circuit diagram by clicking on the according symbol: The bypass (B), feedback (FB), inserts 1 and 2 (INS 1 and 2). Apart from the bypass, you can active the device at different places in the diagram. That means you can decide, when signal is routed through the device – for example before or after the filter. Therefore, don’t be surprised, that you won’t hear unplaced devices.
That’s all for day. To be continued. I hope that helps.
alexander