hearandknow

Archive for the ‘music theory’ Category

Play drums like a hero

In drums, music theory, push, sample, software on December 16, 2015 at 14:41

Many hip hop musicians are used to play beats with pad MIDI controllers like Ableton Push, Maschine, or MPC. To be honest, hip hop is not my favorite music style, but I’m envious of their dexterity when playing pads.

Today, I stumbled over Melodics. Melodics is an app like Guitar Hero for Mac and PC. The idea is simple, you are trained to press the right button at the right time in order to create something like  music.

The download of the app is free and there are 20 free lessons. The training starts with simple lessons (with kick and snare), but they become more complex with the time.

Yes, it’s really similar to Guitar Hero.
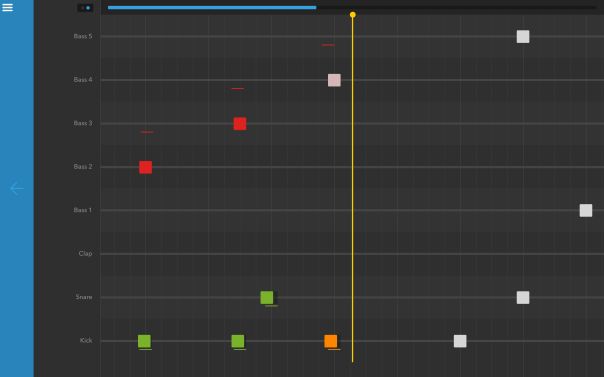
Melodics: guitar hero like interface.

Melodics: guitar hero like interface.

After playing a while, you get a feedback about the precision of your playing. Missed notes and too early or late ones. Gamification, do a job good and reach for that reason the next level.
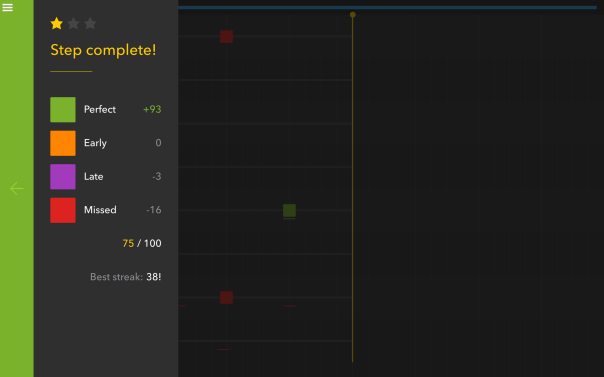
Melodics: get feedback

Melodics: guitar hero like interface.

The lessons are labelled with musical styles. You get a short explanation, what’s typical for the actual  style. There are even fingering tips for each lesson. Great, although they only make sense when playing complex patters.
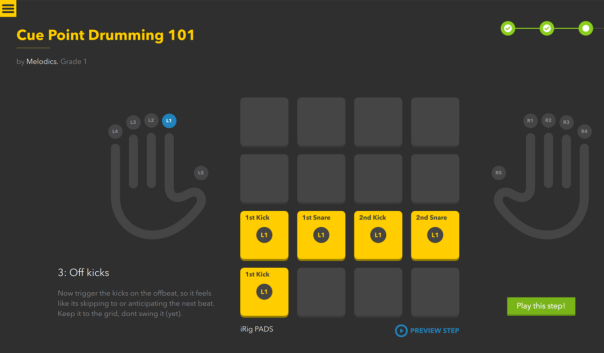
Melodics: fingering

Melodics: guitar hero like interface.

From that perspective, Melodics is like Guitar Hero should be. But what I do miss is the opportunity to create your own stuff with the given samples. An export function or (even better) Ableton Live integration would be nice.

The payment model is not my favourite. You have to pay for month or year. I guess, it’s suitable for beginners, who will – after a few weeks – stop learning with that app and start making their own stuff. For me, occasional users will not be pleased with subscription. I guess, Guitar Hero is paid once, isn’t it?

However, this app makes sense and is really fun. So, give it a try.

alexander
The isomorphic note layout

In ableton, chord, harmony, music theory, push on March 15, 2014 at 18:48

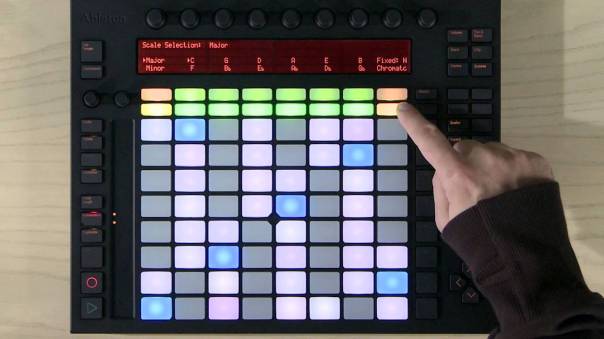
At the latest since Ableton Push came out its key layout became popular. This key layout is called isomorphic note layout. But this idea is not new; accordions using various isomorphic keyboards have been built since the 19th century.

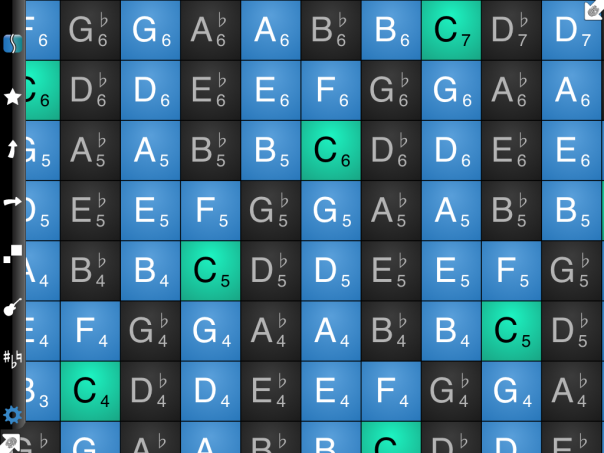
In contrast to Push’s in key mode all notes are part of the layout, so you can play notes, which are not in scale. From my point of view this allows musicians more creativity. Use Push’s chromatic mode, if you like go this way.

Ableton Push in chromatic mode

Ableton Push in chromatic mode. As you can see, the not in scale notes are greyed out.

If you don’t own a Push, you can try one of the iPad apps like Musix.

Musix shows the C major scale.

Musix shows the C major scale.

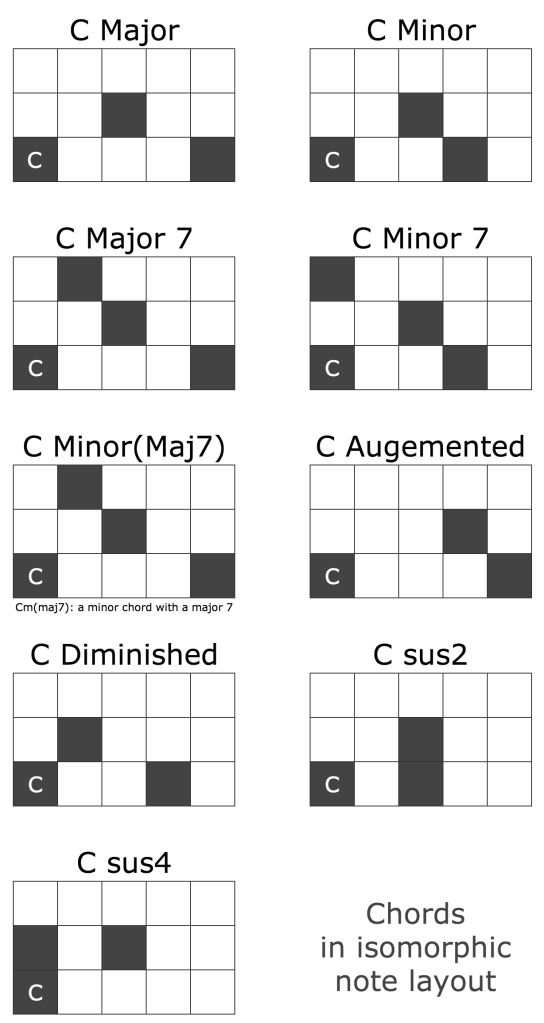
The main advantage of this layout is the transpositional invariance. That means chords have the same shape when transposed to another key. So, you can transpose the following shapes by moving them horizontal or vertical.

Robbie James from Lostbeat made wide-ranging tables of shapes for chromatic and
in key mode. Have fun with it! alexander

Chords in isomorphic note layout

The psychology of music

In music theory, psychology on November 8, 2012 at 19:30

Psychology of Music detail

“There’s more to why we like music than just a catchy beat or an easy karaoke tune. Dozens of receptors in or brain respond to differen musical aspects like tone, rhythm and lyrics, determining the qualitites we personally like and dislike. Don’t let music just go in one ear and out the other – learn how to interpret your brain’s response to music, the benifts of listening to it and the importance of music education.”

The following infographic is made by the department for music education of the university of florida.

Infographic about music psychology

The first app I really need

In chord, iPad, scale on July 13, 2012 at 23:54

Yes, I have an iPad, too. But I’m not so happy with the most music apps. I have no use for virtual instruments on the iPad, because my mobile device is a Macbook Pro. Some weeks ago I tried the Pro Chords app, in order to find inspiring chord progression. But this app not really works for me. Maybe because of the user interface.

Today I tried again an app for iPad or iPhone. Its name is Octavian made by Bitnotic. It is musical reference tool for any musician of any style. Octavian provides access to over 500 scales and 100 chords, with any root note and in any mode or inversion. Of course the app plays notes and chords with an acceptable piano sound. It is cheap and available at the app store.

You have different views. The scale view offers access to many scales. The interface is intuitive and useful.

I especially like the progression view. It’s very useful and the option to store your favorite chords and play them automatically after each other is great.

The drop down on the left botton takes you for example to the chord dictionary. Where you can explore a vast amount of chords.

There is a settings dialog, where you can adjust the software – in a particular context – to your personal needs.

And there are a lot more impressing and inspiring features. Go to the dictionary page and just enter some notes. The app will guess the fitting scale or chord. Great!

That’s all for today.

alexander

Chord progressions in your hand

In chord, harmony, iPad, music theory on March 15, 2012 at 01:37

Corresponding to the new (third) iPad generation, I would like to write something perhaps useful about a music app. Since a few days, I’m using the ProChords app for iPhone, iPad and iPod touch. To be honest, I have only a modest knowledge about harmony and all of these things, so this tool could help me finding new chord progressions.

ProChords add, edit and copy chords.

Yes, there is a wide range of chords fitting to the scale you are currently working on, but that’s not all. The app suggests chords for the last one of your progression or especially fitting between two of your chords. According to the company, is there a kind of database in the background of the app with ..

.. more than 9000 different progression patterns extracted from the latest 50 years of rhythmic music.

Impressive! Of course, you can rearrange, add or delete chords, every time. I think, the addition note for the bass is a great idea. The current chord (and bass note with different color) is as usual displayed on a piano roll. A acceptable piano sound plays each single chord and the whole progression.

Insert a chord between two chords of your progression.

Maybe you like for a clearer impression to watch the ProChords Video.

After storing a progression you would like to transfer it into your DAW. But there is a weakness – a time-consuming procedure. The app sends the progression via email to you. The app told me, that I could wait for the mail up to 15 minutes. I hope, that should be an absolute exception. I case you get the mail, you have to click a link to the prochords.dk site, where you have to download the MIDI file. That’s takes to much time. There is an improvement definitely necessary. I would prefer a complete workflow integration into my DAW.

Anyway, ProChords is a nice app to find, edit and store chord progressions.

Best regards! Your alexander

How to make a dubstep bass

In ableton, dubstep on October 22, 2011 at 16:48

Some days ago I found a nice tutorial by Danny Bonnic called How to make a Dubstep/Drum’n’Bass/Breakbeat instrument with Ableton Live. The result sounds interessting and the opportunities are really great. The secret of this instrument are to things: Layering of two instruments and usage of an oscillator. So take a closer look.

Start Ableton Live, go to the “Live Device”s and drag an empty Instrument Rack into a MIDI track.

Empty instrument rack

Drag a Operator instrument into this rack. If you use the instrument itself and not one of its presets, you should not have to edit a value. But of course this could be the first improvement of this aproach.

The operator in the rack

After that edit a simple bass clip like in the screenshot.

Four bars track

In order to get a nice modulation and layering drag a Analog instrument into this rack. It’s not necessary to use a preset. First you should adjust the balance between the volume of the Operator and Analog instrument. I think the second instrument is a bit too loud. So we get a first impression how the instrument will sound.

Analog in the rack

Now I will change some Analogs parameters. Set the wave type to square wave.

Set square wave

Select the Amp1 section. Set the Decay to 6.31s, Sustain to 0.64 and Release to 82 ms.

Edited amp section

Now there’s more excitment coming up. I activate the filter Fil1 and chose the band pass 12 filter typ BP12. The filter value could be 1.4k and resonance Reso to 40%. In order to let an LFO control the filter, we have to set the LFO1 in the Freq Mod section to a value like -2.96.

Filter section

Finally go to the LFO section activate LFO1 and set the rate mode to notes and a quarter note.

The LFO section

If you experiment with the LFO1 Rate you will get great modulations. Enter a modulation of this control like in the screenshot and listen to the result.

LFO rate modulation

So, we are almost finished and experiments are welcome. I for example have added a Redux effect to the Analog chain. The sound get more extrem.

Add redux effect

My tip is to check out the usage of the Vocooder effect. Maybe you get sounds like Native Instrument‘s Razor.

See you next time.

alexander

Record sales

In history on August 21, 2011 at 14:47

Today just a quick note about sound carriers and sales. This diagram shows the past 30 years of record sales.

Record sales

The past 30 years of record sales

Click the picture to see the animation. An especially interesting aspect is that after the LP/EP decrease the Cassette’s dying started.

alexander

How to create a dub delay

In ableton, dubstep on February 26, 2011 at 20:02

A few days ago, I discovered a nice video tutorial about creating a dub delay by pointblankonline. I have tried to find out some improvements and extensions. Here are my results. I especially like my combination of noise and delay. If you are interested in exact parameter values, please refer to my screenshot, because normally I won’t write out these values.

Make sure ableton shows the return tracks and send section. If necessary activate the buttons on the right labelled “s” and “r” (a in the screenshot). How could it be otherwise – we start with adding a delay to our new effect rack. In order for that go to the “Live Device” browser for audio effects and drag a “Ping pong delay” on any return track (b). You can find the track on the left side of the master track. Press CMD+R and rename the track to “Dub delay” for example (c). As you probably know, by changing the “Sends A” knob you can control the audio signal routed to the return track (d). And here is my first insiders’ tip. Make feedback possible for your return channel. It’s essential for a dub delay. Initally the “Sends A” knob of the return channel is greyed out, means disabled. Enabel the knob through the context menu and chosoe “Enable send” (e).

The effect sounds good, but for my taste the stereo panning is a bit to extrem. Just fix this by dragging the “Utility” audio effect behind your delay. Take a look at my screenshot to find suitable values. Whenever feedback takes place you should use a “Limiter”, your audience will thank you for it. It’s time to group the devices into a rack. Click on any device, PRESS CMD+A and CMD+G.

But now it’s high time to start with a first performance. Unfortunately we have to do some preliminary work. If you like to control some parameters through a MIDI hardware controler, you should map some MIDI controlers to different parameters. The first step is defining some macros. Open the context menu of the ping pong delays “Center frequency” and choose “Edit macro map”. The macro controls of our effect rack will appear. I mapped “Macro 1” to the “Center frequency” and “Bandwidth” to “Macro 2”. It’s always useful to rename the macro name by pressing CMD+R.
The next step is activating the MIDI map mode and map some parameters of your MIDI hardware controler. I suggest mapping the send knobs of the audio (a) and return track (b). Further the recently mentioned two parameters of the ping pong delay (d). Here another insiders’ tip. Map a button of your hardware controler to a track title bar (c) in order to activate the track (bring it in front).

You may note that the ping pong delay runs in delay mode “Sync”. I think a delay sounds more authentic or vintage, when we use the other mode called “Time”. In my opion it is more comfortable to add a second ping pong delay to the effect rack instead of switching the already existing delay. In order to switch between these delays we have to map
both device activators to the same macro called “No Sync On” for example. It is essential
to control the delay time of the non synced delay. Just map it to a second macro “Time Delay”. Finally MIDI map the new macros to your hardware controler.

We are almost done. Let us try Abelton’s “Vocoder” effect. Drag the device before the delays and choose the “Noise” mode. Then map its device activator to a macro called “Noise on”. I have MIDI mapped this controler to a button of my hardware controler, too.

I think that is possible to realise a dub delay for live performances with Ableton Live. You need fingertips and a couple of time to handle such effect, but it works.

Alexander

A late christmas present

In ableton, dubstep, link on December 30, 2010 at 16:23

Hello! The christmas holidays are over. Jim Hurley has made us a late christmas present. The exciting live livepack is called overload.  Surprisingly, there is no page about the livepack. I just can offer you the download links for Abelton Live 7 and Live 8.

A late christmas present

After installation you can find the devices in your lives device browser under:

  • Instruments/Instrument Rack/-Jim Hurley-/Overload
  • Audio Effects/Audio Effects Racks/-Jim Hurley-/Overload
  • MIDI Effetcs/Midi Effect Rack/-Jim Hurley-/Overload

But what do the instruments sound like? I would call them experimental, atmospherical and dark. So a good choice for making dubstep. Check out my sound example to gain your own impression.

For my mind the instruments stereo effects are a bit over the top. So I used the Abelton’s Utility effect to reduce the influence. Unfortunately, these instruments stresses your CPU. 60 percent CPU usage is too much. I propose you record a audio clip to use it.

That’s all for 2010. I wish you a happy new year.

Alexander

Creating a dubstep bass with Ableton

In ableton, bass, dubstep on October 17, 2010 at 13:58

A few weeks ago I found the great video tutorial “Creating a Dubstep wobble / bass sound in Ableton Live 8” made by dubspot. The tutorial shows how to create a dubstep bass in Ableton Live using the Simpler instrument.

Here is my experience with the video instructions. I have created a MIDI track and dragged the “Simpler” instrument into it. After that I downloaded a wave file from Dubspot, which is used in the tutorial, and added the sample by dragging it into the instrument. Then I have to make some settings:

  • Activate “Loop” and “Filter” and select filter “Type” “BP12”
  • Set the filter frequency “Freq” to 290 Hz.
  • Turn filter envelop on and the “Env” field to “-20”.

We are programing a bass sound, so I have set the number of voices to one and activate the glide function. In order to get a more expressiv and more dynamic sound set the filter velocity “Vel” to about 34 % and “Attack” to 54 ms. To get a more spatial result, set the “Spread” to 35 % – this sound like a chorus.

Simpler I

Simpler settings for the dubstep bass example.

We are almost done, but there is one thing missing: the dubstep typical wobble sound. For this set “LFO” on, sync the LFO with ableton (press the “note” symbol), swipe 8th notes and set the LFO amount to about 20.

Simpler II

Simpler MIDI mappings for the dubstep bass example.

What we have done is especially useful, when you play with some parameters while playing the this bass instrumen. So I MIDI mapped some controler knobs to a few instrument parameters. In order for that select the MIDI mapping view and map this:

  • “Beat” – LFO rate (beats) – LFO synced rate (useful range: 1/4 – 1/24)
  • “LFO” – Filter < LFO – Filter < LFO (useful range: 0 – 24)
  • “Filter” – Filter Cutoff Frequency – Filter Frequency (useful range: 30 Hz – 18.5 kHz)
MIDI mapping

MIDI mapping for the dubstep bass example.

In the end I don’t want to keep my first result from you. That is how it sounds. Bye for now.

Alexander